You’re five miles from home, legs feeling good, ride going exactly as planned, or you are in the middle of the trails, having just cleared a rough patch of gravel or rocks — and then you hear it. That slow, defeated hiss. You pull over, squeeze the tire, and yeah, it’s going soft. You’ve got a pump at home. You’ve got a spare tube in your bag. What you don’t have is any real memory of how to use either of them properly without fumbling around for ten minutes.
We’ve all been there. And honestly, the pump is one of those things most of us never actually learned — we just figured it out badly, once, and repeated that same guesswork ever since.
Getting this right takes about ten minutes to learn and saves you from a lot of frustrating roadside moments. So, in this post, we will cover how to identify your valve type, dial in the right pressure for your riding style, attach the pump head without losing air, fix common leak problems, and keep your pump working for years.
Table of Contents
Identifying Presta vs. Schrader Valve Types
Before you pump up your tires, you need to know what you’re working with — jamming the wrong pump head onto the wrong valve is a fast way to strip it or stand there baffled while your riding buddies wait.
The Schrader Valve: You Already Know This One
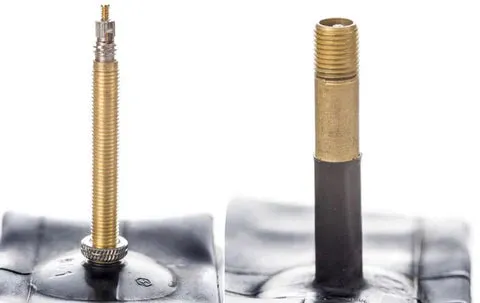
The Schrader valve is the same valve on your car tire — wide, sturdy, with a spring-loaded pin in the center. Hybrids, mountain bikes, kids’ bikes, and anything from a big-box store almost certainly have these. Just attach your pump head directly and inflate. No prep required.
The Presta Valve: Skinny, Fussy, and Worth Understanding
The Presta valve is narrower, has no spring mechanism, and has a small brass locknut at the top that you must unscrew before air can move in or out. Road bikes and most modern gravel bikes run Presta. The most common mistake is trying to inflate without loosening that locknut first, then blaming the pump when nothing happens.
How to Tell Them Apart in Five Seconds
Wide and car-like? Schrader. Thin with a tiny nut on top? Presta. In dim light, run your finger along the stem — Presta valves have threads you can feel all the way down; Schrader valves are smooth on the outside.
Pump Compatibility
Most modern floor pumps handle both valve types via a dual or reversible pump head — no need to own two pumps. Or you can get an adapter like this. Check your pump head before buying anything new. Worth knowing: Presta valves handle higher pressures and require a narrower rim hole, while Schrader valves are easier to top up at gas stations.
Determining the Optimal Tire Pressure for Your Ride
You pump your tires until they feel “hard enough,” head out, and spend the whole ride wondering why everything feels either sluggish or punishing. The number printed on your tire sidewall is a maximum pressure rating, not a recommendation — and that distinction matters more than most people realize. Pump too hard and you sacrifice grip and comfort; too soft and you risk pinch flats and sluggish handling.
Forget the old advice that harder tires are always faster. On anything but a perfectly smooth surface, lower pressure absorbs vibration and keeps your wheels rolling more efficiently, such as on mountain bike trails. Here is what actually guides a smart pressure decision:
- Rider weight is the biggest factor. Heavier riders need more pressure to prevent pinch flats and rim contact — a 130-pound rider and a 200-pound rider should never run the same PSI on identical bikes.
- Tire width changes everything. Wider tires carry more air volume and run lower pressure by design — a 32 mm tire can feel perfect at 60 PSI while a 23 mm tire at that pressure would feel dangerously soft.
- Road surface should adjust your baseline. Gravel, chip-seal, or rough pavement all benefit from dropping 5–10 PSI compared to your smooth-road setup.
- Tubeless setups can run significantly lower pressure without pinch flat risk, opening up a more comfortable and grippy ride.
- Temperature affects pressure more than people expect — cold morning air can drop your PSI noticeably from what you set the night before.
In general, road tires usually are at higher pressure than mountain bike tires. Today, find the recommended pressure range on your tire sidewall, start in the middle, and adjust in 5 PSI increments until the ride feels right for you.
Step-by-Step Instructions for Attaching the Pump Head
You have checked your valve type, you know your target pressure — and then the pump head hisses, pops off, and you lose half the air you just put in. It happens to everyone, and almost every time it comes down to the same fixable mistake: rushing the attachment before the head is properly seated. A gentle, deliberate approach beats brute force every time — the goal is a clean airtight seal without damaging the valve stem.
- Prepare the valve: Remove the valve cap. For Presta valves, unscrew the small brass locknut counterclockwise until it spins freely — skipping this step is the most common reason air refuses to go in. Give it a quick tap to release any stickiness. For Schrader valves, no preparation is needed beyond removing the cap.
- Orient the pump head: If your pump has a dual head or reversible gasket, confirm the correct opening is facing the valve before you commit to the connection.
- Align and push straight on: Any sideways angle creates a poor seal and guarantees leaking. Press firmly and evenly until you feel the head seat against the valve base.
- Engage the locking lever: Flip the lever to lock the head in place. This compresses the internal gasket and activates the seal — you should feel a slight resistance confirming it, not just a loose clip.
- Check the seal, then inflate: Give the head a gentle tug and listen for hissing. If it holds, inflate in steady strokes and check your pressure gauge every 10–15 pumps to avoid overshooting your target PSI.
Practice this sequence at home once before your next ride so the motion feels automatic when you need it roadside.
Troubleshooting Common Air Leaks During Inflation
You’re pumping away, watching the gauge climb — and then you pull the head off and the tire is somehow still flat. Most air leaks during inflation aren’t mysterious. They’re almost always one of a handful of fixable problems, and none of them require a new pump.
Before you throw the pump across the garage, work through this list. Nine times out of ten, the fix takes about thirty seconds.
- Pump head not fully seated: The number one offender. If the head isn’t locked down completely onto the valve, air escapes the moment pressure builds. Push the head down firmly and straight before flipping the lever.
- Presta locknut left closed: The small brass locknut at the top must be fully unscrewed before inflation begins. A closed locknut blocks airflow entirely and creates a hissing blowback effect.
- Worn or dry pump gasket: The rubber gasket inside the pump head degrades over time — especially in extreme storage temperatures. If the head feels loose even when fully attached, a drop of silicone lubricant often buys months more life. Visible cracks mean it’s time for a replacement.
- Damaged valve core: If air leaks directly from the valve stem, the valve core may be bent or loose. A cheap valve core tool can tighten or replace it in under a minute.
- Pump hose crack: Less common, but worth checking. Flex the hose while attached and listen for hissing along its length. A cracked hose usually means a replacement hose or a new pump.
Next time you hear that familiar hiss, re-seat the pump head first before assuming anything else is wrong.
Essential Maintenance for Bike Pump Longevity
We treat bike pumps like they’re indestructible — shoved in a garage corner and forgotten until the next flat. But a little basic care prevents almost every common failure, from gauges that stop reading accurately to heads that leak air at the worst possible moment.
Here is what actually matters:
- Lubricate the pump barrel annually. Apply a small amount of silicone-based grease to the piston shaft to keep internal seals from drying out and cracking. Avoid petroleum-based products, which degrade rubber over time.
- Inspect and replace O-rings regularly. These small rubber components create the airtight seal needed for efficient inflation. Check them every few months — if you notice air escaping around the valve stem or reduced pumping efficiency, they likely need replacing. Rebuild kits from most manufacturers cost almost nothing.
- Clean the pump head and nozzle. Dust and road grime accumulate in the delicate mechanisms and can prevent a good valve connection. A quick wipe-down once a month keeps everything seating properly.
- Keep the hose free of kinks. Wrapping it tightly around the barrel weakens the hose over time. Let it hang loosely or coil it gently beside the pump.
- Store your pump upright and indoors. Extreme cold stiffens seals and makes pumping harder than it should be. A dry corner of your entryway beats an unheated shed every time.
Before your next ride, take thirty seconds to inspect your pump head gasket. That’s the habit that keeps you rolling.
Go Pump Your Tires and Actually Enjoy the Ride
Getting air into your tires sounds almost embarrassingly simple — until you’re standing in a parking lot with a hissing valve and no idea why. But now you know the valve types, the right pressure for your ride, how to seat the pump head without losing your mind, and what to do when things go sideways. That knowledge sticks with you every single ride.
A well-inflated tire is genuinely one of the smallest efforts with the biggest payoff in cycling. Smoother rolling, better handling, fewer flats — all from two minutes of attention before you head out.
Right now, before your next ride, pull out your pump, check your tire sidewall for the pressure range, and do a proper inflation. Time yourself. It’ll take less than three minutes — and you’ll feel every one of them under your wheels.
Related Cycling and Training Content

Mukund Murali is the founder of Pedal My Way (pedalmyway.com), a cycling and fitness media brand reaching 50,000+ monthly visitors. He brings 20+ years of cycling experience spanning road, gravel, and mountain biking, with deep expertise in bike mechanics and repair. A CrossFit L1 and L2 certified trainer (2018–2023), Mukund combines strength training methodology with cycling performance to create evidence-based content for the everyday rider. He is the host of Ask The Pedalist podcast and creator of the PMW Fit workout app on Google Play.